How to Make An Outbound Call Via a Webhook
Last Updated: December 19, 2024

In this article, we’ll walk you through the process of setting up outbound calls with Local Business Pro. This feature enables businesses to automate customer calls using AI, but it requires careful configuration to ensure compliance with legal regulations. We’ll cover why this feature is valuable, provide a step-by-step setup guide, and offer tips for troubleshooting.
Why You Need This Feature
Automating outbound calls with AI can significantly enhance customer engagement and streamline communication. Businesses can use this feature for appointment reminders, follow-ups, or promotional calls, saving time and reducing manual effort. However, compliance with legal requirements is crucial to avoid potential fines and ensure respectful customer interactions. This setup ensures that calls are made only to those who have consented, protecting your business from legal issues.
Important Disclaimer:
Before diving in, it’s crucial to note that outbound calls using AI must be done with proper consent. In the United States, it is illegal to make outbound calls using AI without the recipient’s consent. While we’re not legal experts, we encourage you to do thorough research on consent regulations. At Local Business Pro, we prioritize ensuring that our outbound call feature is used ethically and legally. If you’re unsure about your eligibility or need access, don’t hesitate to contact our support team.
Important Note:
Before you will be able to do outbound calls with your AI receptionist, you must first submit a request to our support team and receive approval. Once you have complied with all requirements and your request is approved, the first step is to understand and configure webhooks, which are essential for setting up outbound calls.
Understanding POST Calls and Webhooks
Transcript
00:00 Hey everyone, Keaton here with Local Business Pro, and I’m super excited to show you guys all about our outbound call and how to get it set up for your account.
00:08 Now, a little disclaimer here, that the outbound call is based off of approval only, and that’s simply because here in the United States where we’re at, it is illegal to make an outbound call with AI.
00:20 to someone who has not consented to it. Now, there’s a lot of ways that someone can consent to it, however, we’re not lawyers, so we’re going to let you guys do some research on that, uhm, and what we’re going to do is just make sure that the people that we give access to outbound and the companies that
00:36 we give access to outbound, uhm, are trustworthy, right? So, if you don’t have access to them, and you’re reading this on a blog, uhm, reach out to us, reach out to support, apply for outbound, and we can look over your use case and decide yes, that is a legit way, or no, looks like we’re trying to spam
00:50 people, we’re going to deny it. Now, the reason why we care so much about this is because we really care about AI, and we think it’s this awesome tool that can help businesses and help consumers, uhm, get better service, and we want to protect that, so we take it very serious over there. 01:04 But, anyways, now that the disclaimer is out of the way, let me show you guys how to set this up in your business, okay? 01:12 Uhm, we have this document here, and this document’s going to walk through everything, it looks a little long, it looks a little daunting, but I promise, we’re going to skip everything. 01:20 Through it. Now, if you already know what you’re doing with webhooks, don’t watch this video, okay? Just get your document, go plug it in, and go start making outbound calls to help convert more customers, or get more customers booking appointments, whatever your use case is. 01:34 Uhm, but for those who don’t know what webhooks are, don’t know how to do this, don’t worry, we’re going to go step by step. 01:40 And we’re going to make it through this, and you’re going to have this awesome ability inside of your business to call customers on an automated way, right? 01:48 So, what is a webhook? A webhook is a way for one application to talk to another application, right? So one website is talking to another website, and the best way you can think of about it is a baseball pitcher and a baseball catcher, right? 02:04 You got that pitcher up on the mound, he’s looking around, takes the ball, throws it, and then you have the catcher there waiting for it to catch it, right? 02:13 That first website is the pitcher, the second website is that catcher, and the information that you’re sending is the ball. 02:20 Flying through the air, right? That’s all we’re doing, playing a little bit of catch, right? So, there are a couple benefits of using webhooks. 02:29 The first is real-time communication. So as soon as a user submits a web form on your website, you can trigger a webhook, right? 02:38 So if you guys are using WordPress, or if you’re using another website builder, such as like Squarespace, or something like that, you can do this from WordPress, right? 02:47 You can do that from there. As soon as someone submits a form, you can send a webhook. However, if you’re using a tool like HubSpot, or Salesforce, or another CRM, then most CRMs allow webhooks. 02:59 You can do it to WordPress. Where, after a certain amount of days, then a webhook triggers to call a customer to remind them that their service date is coming up, and if you needed, you know, if they needed a call to confirm it, or reschedule, or anything like that, you can do that, right? 03:17 So, it’s real time, and it’s extremely efficient. Right? And, you got the power of automation, depending on what tools you’re using. 03:26 So, we got a couple use cases we just went over, you can see how powerful these webhooks are going to be. 03:32 So, the next thing we have to do is learn how to set up a webhook, so that your application can talk to Local Business Pro, so that Local Business Pro can make that outbound call. 03:40 And, help you with your use case, right? So, the very first thing, there’s three of them, right? A URL to receive the data, that’s that catcher, right? 03:50 We have a URL, it’s right here. And, every single time, you’re going to use this URL, okay? Then, you have to have a trigger event. 03:58 You guys are going to decide what that trigger event is. Is it a form submission, or is it when a customer moves over onto a sales pipeline, and you want to automatically call them, um, because their service date’s coming up, or something like that, right? 04:12 Then, you have the payload data. Now, the payload data, as we talked about before, it’s that baseball, right? So, if you take that baseball and throw it, what are you sending? 04:20 Now, there’s a couple of things that we care about, to make sure that we know that it’s actually you sending us the information, instead of somebody else trying to act like you and hijack your account. 04:33 We don’t want that, right? Um, so, we have a list of payload data here that we need to verify. The first one that’s required is that URL, right? 04:45 This URL has been programmed to receive a POST method webhook, um, and then process that information and perform an outbound call, right? 04:56 So, if you don’t know what POST is, um, don’t worry about it. You don’t really need to. To know that information, just make sure in how you’re doing it, it’s not a get, a put, or a delete, right? 05:08 Just look for that POST, and there’s normally a drop down, and I’ll show you that in just a minute when we actually set up a live outbound call on this phone call, I mean, sorry, on this recording here. 05:20 So, the next thing up is you got your public key. Now, your public key is kind of like your password, but not super, it doesn’t need to be super secure, it can be public, right? 05:30 And uhm, so, you know, it’s a, it’s a random character string that identifies your account, right? Very super similar to a secret key, However, your secret key needs to be private, right? 05:43 Don’t share your secret key anywhere that you wouldn’t want to put your account password. So, if you got a colleague, someone who’s helping you with this and you trust them, it’s okay to share your secret key, right? 05:52 Because you trust them. Uhm, but if some guy you hire off of Fiverr or Upwork to help you with stuff, probably not okay to share that secret key. 06:00 Because you don’t know what they’re going to do with it and that secret key is the exact same thing as the password to your account. 06:08 It’s that powerful. So, if it gets in the wrong hands, you know, we don’t want somebody making outbound calls and then you are paying for it or breaking the law and you get caught for it, right? 06:17 So, that secret key, let’s keep it secret, okay? Now, the two, this is the phone number that you guys want to call. 06:24 Now, a two, when you put that phone number in there, make sure that you have the country code. So, for example, in the United States, in Canada, the country code is one, but in Italy, it’s 39. 06:36 So, if we’re going to take this phone number here, 801, 555-1234, all we would have to do is add a one before it, because it’s a U.S. 06:47 number, right? So, then that becomes one, 801-555-1234, okay? And, some of the cool things is that these CRMs, uhm, actually format that for you that way anyways. 07:00 So, that you just have to make sure that you get the contact right, and then it’s super easy, right? And, we’ll show you that. 07:07 Now, let’s talk about consent given. So, in the United States, uhm, it is against the law to call someone with AI that has not consented to it. 07:16 Now, this is because we don’t want to call a bunch of people and, uhm, have them say, make them feel like they’re being spammed, so that they get AI banned, right? 07:24 And, uhm, so what we do is, whether it’s true or not, uhm, our approval process will hopefully make sure that people are using our outbound are honest and they have integrity, but we double check here and say, did they consent to this phone call? 07:40 And that could be in your terms and conditions, right? I’m not a lawyer, uhm, but they need to consent to it, so when they receive that outbound call, uhm, that we’re all following the law, right? 07:51 Now, we’ve got your bot ID. So this is a variable that’s unique to your account and it’s the actual ID associated with your receptionist, okay? 08:00 Now, to get that information, you’re probably gonna have to reach out to us. If you went through the approval process and got approved and you’re seeing this document, it should already be pre-filled out for you there, okay? 08:10 Now, if you look at the business ID, this is the ID associated with your business. Same thing, you’re gonna have to grab that from us, uhm, but it should be on that document ready to go for you. 08:18 Now, variables. This is probably the most complicated part in this whole, in this whole thing, right? And it’s a, it looks like this. 08:27 And you’re like, what? This is super complicated, it’s confusing. Deep breath. It’s not that complicated, I promise, and we’re gonna walk through it so that it doesn’t, uhm, doesn’t have to be complicated, right? 08:39 Okay? So. This is more information that breaks down exactly what we just covered, and then, uhm, understanding the JSON. JSON is just a way to structure data so that computer systems can read it, right? 08:54 And, uhm, here’s an instructions right here on how to create your own, right? So you start with curly braces, okay? 08:59 And here’s our example. So we start with curly braces, then you add what’s called a key value pair inside the curly braces. 09:08 And to do that, I’m gonna tab these in here, to do that, the first thing is the key. Like, what are you naming something? 09:17 So, if I have this data here, this JSON right here, here, and uhm Bella, well Bella is a what? Bella is a first name. 09:26 So I’m saying first name is Bella. You might be thinking, well can I do it this way? Absolutely. You can put literally whatever you want in here. 09:36 I could put blah blah blah, and it’s okay. Uhm, it’s just whatever you are. You are deciding to name it, uhm, because when we go into your prompt, we’ll actually look for what you put into these keys here, and we’ll replace it with what the value is. 09:52 So for an example prompt, it could say, you are calling first name, uhm, who last had a service, last service. 10:00 day on June 8th, uhm, they drive a car make, car model, so they drive a Toyota RAV4, and so when your AI receptionist receives the instructions, all these, all this information is already filled out for it, and you can really personalize that conversation to that user, and make it seem like, oh my goodness 10:22 , this is incredible, I’m talking to an AI receptionist who knows everything about my account, uhm, and make it a lot more natural for them, right? 10:30 So, first one, you put in double quotes, then you put a colon, and then you add the value under there, and then you do a comma to do the next. 10:41 If your, if your webhook’s not working, it’s probably this, so what I would do to test it, is go up to the, uhm, your payload, and just remove the variables one, because it’s not required, right, it’s optional, and then you can test that, and if that’s not working, hop on a support car, we would love 11:00 to test So, let’s go through, and set up our very own webhook, k? So I’m gonna scroll back up here to the top, and right here with this payload data, and then I have another tab here, that is my CRM automation tool, k? 11:20 So, I’m going to, I can create a trigger, right? When is that baseball player gonna throw that ball down the line, right? 11:27 You guys get to decide that. And in this system, I can do a birthday reminder, hey I’m just calling you to wish you a happy birthday, right? 11:35 I could do ah, if I change a contact, or if I added a tag, right? So I’m gonna do, you know, if there’s a task reminder, whatever that is. 11:45 So I’m just gonna do a birthday reminder here, okay? And so I’m gonna save that trigger. So when it’s somebody’s birthday, it’s gonna call them and wish them happy birthday, okay? 11:56 So, now I’m gonna click another plus, and I’m gonna search in here, webhook. So there’s that webhook, and here’s that method that we were talking about, right? 12:06 Sometimes you just skip over it, not even think about it, but we don’t want it to be a git, we want it to be a post, okay? 12:13 So now we go to that first field of requirement, right? Where’s that catcher at, right? Uhm, well, he’s at this url, that we’re providing for you guys right here. 12:22 So all we do is we grab that url, we come back over here, and we’re going to paste that in, okay? 12:30 Now, we have to add the rest of the data, and we do this by adding an item, okay? Now, key value, right? 12:39 You don’t know that, you know this, but the CRM and most CRMs send data anyways in a JSON format. They do this key value pair. 12:49 Uhm, and so what we’re going to do is come down here, and you’re going to grab the public key, and I’m just going to put an ABC in 1, 2, 3 here, so you guys can see this, and I’m going to put in my public key here, I’m going to go back here, I’m going to copy this, and I just paste it here. 13:06 I add another one, secret key. I’m just going to keep going down this list, and I’m using dummy variables here, and now I do the 2 one. 13:18 Now this is where it gets a little bit interesting, right? Because again, if you don’t have that country code, we don’t know if you’re trying to call Canada, uhm, Italy, Great Britain, or the United States, right? 13:31 We don’t know. So we have to add that. And luckily, in most CRMs, you can do, uhm, I’m going to click on this little dot tag here, and I’m going to come up to contact, and then I’m going to do phone raw format, okay? We don’t want to have any parentheses, any dashes in there, or anything like that. 13:52 Just phone raw format, and then that way, whatever contact’s birthday it is, that’s who we’re calling, okay? Or I can just put my phone number in there, so if I’m building this to test, just put your own phone number in there, and write it out, like 1-801-555, whatever that number is, because that’s 14:11 going to make it easy. Okay, now we’re at the consent given standpoint, you can hard write it like that, like true, so it’s always going to be true, but just make sure that they did consent, okay, you got that bot ID, bot ID is going to be a number like 178-1000-3000, whatever it is, you got your business 14:32 ID, business ID might be something very similar to that, then we’re going to go into your variables, Alright now this is where it gets a little bit tricky, now also I just want to highlight, make sure this is all lower case, kind of throughout, right, as I’m creating this document I just realized that 14:50 I put that in as a capital V, I want to make sure it’s lower case, so when you have your variables, right? 14:57 We kind of provided this example JSON here. So that if you guys wanted to add something, like maybe you’re not a car company at all and you don’t care about the car model or the car make, but maybe you care about their like business website, right, so I can type in website here and then change it into 15:15 , you know, whatever I want dot com, right, so you can edit this really easily or just simply copy this and add on to it, making sure there’s that comma, so you can add and customize these variables however you would like. 15:33 So we got first name, last name, I’m just gonna copy this whole thing and I’m just gonna paste it in like that. 15:41 Delete that and now what I’m going to do is save the action and that’s it. I’m gonna save that one more time, make sure it’s published and turned on. 15:53 And then this, this won’t work because I didn’t have my secret key, like it’d be crazy if I created a uhm a video and I published on the internet. 16:01 So this won’t work but uhm with your correct information in there, it’s gonna work perfectly. And now you might be thinking, well what if my contact’s name isn’t Bella, like in your example. 16:12 What if it’s Jason, what if it’s Jack, what if it’s Jennifer, right? Any J name out there, what if it’s that? 16:19 Easy. All you’re gonna do is do is come into here, right, I like to do this on a different sheet, so I delete everything here, right, because again if you mess up a parenthesis or a comma or something like that, you might break it. 16:33 So I come here, click on the tag, and then if it’s contact information if I’m calling to remind them about an appointment time. 16:40 Maybe I do the appointment, whatever variable you want to pass over from the CRM, so I can do contact, and let’s say that I want their first name, so now I’m going to copy this, and delete it, I mean sorry, go to the other tab, and I’m going to come in here before that quote, and I’m going to delete 17:02 it, so now I just have first name, colon, two quotes, and in between those two quotes, I’m going to paste in that variable. 17:11 Now what that does is the CRM is going to go in, and replace this, so it won’t be Bella, right? 17:17 And now I’m going to do this for every variable that I need that’s unique to that user, right? So now I’m going to go into that contact again, I’m going to go to last name, and then delete that in between there. 17:32 I’m going to go a little fast here for you guys. So go to contact, email, copy that. Go over, paste that in. 17:45 We already have the contact Rob there from mobile phone. Delete that. Now car model, I don’t have one of those in here, so I’m not going to do it. 17:56 But if I do it this way, and I come down here and paste that in, save that action, now all those variables are going to be custom to the person you’re calling, right? 18:09 So now when you follow part two of this video to customize your own prompt, right, then what you can do is call the person, maybe they just submitted a form on your website, and you write your own prompt that says, uhm, first name, just submitted a form on your website, call them and ask them about if 18:27 they’re interested in a promotion, right? So then, phone’s ringing, they pick it up, and the AI, your AI receptionist is going to say, you know, let’s imagine the person’s name is Jake, right? 18:37 So like, hey Jake, I just saw that you filled out a form on our website. Right? That’s how you can really customize that information. 18:43 So, if you guys have any questions at all, uhm, feel free to reach out to us. We really want to help you with this. 18:50 It’s a little complex, just because it’s new, right? New things can sometimes be scary, but all we’re doing is adding the payload into that. 19:00 And then setting up a trigger, so that it works for your business and your business logic. If you guys have any questions again, I can’t say it enough, reach out. 19:10 Thanks a lot. Bye.
Overview
A webhook is a method for two software applications to communicate with each other in real-time. When an event occurs in one application, it can send data to another application via a POST request to a specified URL. This allows for seamless and immediate data sharing between systems.
Post Call
A POST call is a type of HTTP request used to send data to a server to create or update a resource. The data sent is usually in the body of the request
Webhook
A webhook is a way for an application to provide other applications with real-time information. A webhook delivers data to other applications as it happens, meaning you get data immediately.
Benefits of Using Webhooks
- Real-Time Communication: Webhooks allow instant data transfer between systems, ensuring up-to-date information.
- Efficiency: Unlike polling, where one system repeatedly checks another for updates, webhooks push data only when an event occurs, reducing unnecessary network traffic.
- Automation: Webhooks can trigger automated workflows, saving time and reducing the potential for human error.
Setting Up Your Webhook
To utilize a webhook, you typically need three things:
- A URL to Receive the Data: This is the endpoint in the receiving application where the data will be sent. The Url to receive information to then perform an outbound call is https://portal.localbusiness.pro/api/outbound_call_ghl
- A Trigger Event: This is the event in the sending application that will trigger the webhook to send data. Based on the CRM that you are using, this could be when a contact fills out a form submission or when something else happens such as a contact moves from one stage in a sales pipeline to another.
- Payload Data: This is the actual data that will be sent to the receiving application or Local Business Pro. The payload is typically formatted as JSON and includes relevant information about the event and the contact. Below is the payload that you need to use to perform an outbound call with Local Business Pro’s AI receptionist.
To get the payload data, please contact your client success manager at Local Business Pro.
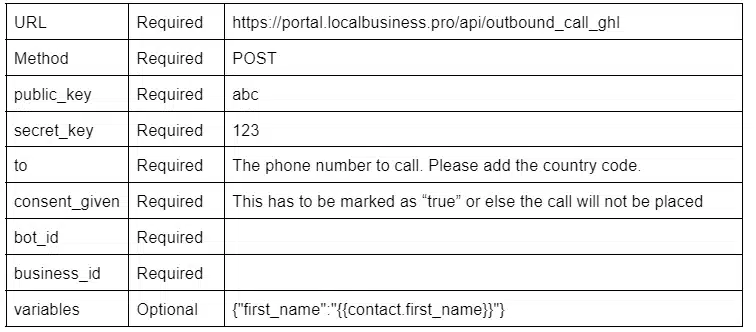
URL: This is the url at Local Business Pro that is designed to read webhooks and generate an outbound call.
Method: This is the method in which Local Business Pro will be able to read the data. For example, a common alternative is to use GET PUT or DELETE. However, only the POST method will work for making outbound calls.
Public_key: This is a string associated with your account in Local Business Pro. You can think of this as a type of password that is safe to share publicly.
Secret_key: The secret key is also a string that is very similar to the pubic key except you do not want to share this publicly and you want to treat this just as you would the password to your account.
To: This is the number in which you want Local Business Pro to call. Note: you will need to add the country code for the call to work. For example, in the United States, you would add a “1” to the beginning of a number. The number “8015551234” would become “18015551234”
Consent_given: Based on local and national laws, consent is often required to do an outbound call that is carried out by an AI such as Local Business Pro’s AI Receptionist.
Bot_id: This is the unique ID that is associated with your receptionist.
Business_id: This is the business ID associated with your Local Business Pro account.
Variables: This variable in the payload is optional but we understand that you might want to provide information to the caller that is unique to them. We allow you to do this via a JSON object. For example, if you wanted to address the user by their name and provide specific account information such as when was the last time they brought their Toyota for a service then you could use the JSON below.
Understanding JSON
JSON is a simple and easy-to-read format used to represent data. For business owners, it’s a convenient way to structure contact information for various uses, such as informing your AI receptionist on specific information when it is making outbound calls.
A JSON object is a collection of key-value pairs. Each key is a string (enclosed in double quotes) that represents a piece of information, and each value is the corresponding data. The entire collection is enclosed in curly braces {}.
How to Create Your Own JSON Object for a Contact
Here’s a step-by-step guide to creating a JSON object for a contact:
- Start and end with curly braces {}.
- Add key-value pairs inside the braces:
- The key is a descriptive label in double quotes (e.g., “first_name”).
- The value follows a colon : and can be text (in double quotes), a number, or a date.
- Separate each key-value pair with a comma ‘,’.
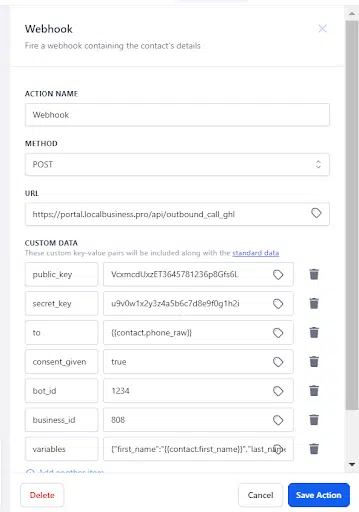
Example JSON Object for a Contact

Here is an example of the Webhook settings. To obtain the payload data and receive guidance on setup and testing, please contact your Client Success Manager at Local Business Pro.
Testing and Troubleshooting
When setting up your webhook, it’s important to test it to ensure it works correctly. If you encounter issues:
- Check Payload Data: Ensure it’s formatted correctly.
- Verify URL and Keys: Make sure you’re using the correct URL and that your keys are accurate.
- Seek Support: If problems persist, contact Local Business Pro’s support team for assistance.
Setting Up your AI Receptionist’s Outbound Prompts

Now that the webhook for outbound calls is set up, we can now enable the Outbound Feature on your Local Business Pro account and customize the Outbound Prompts. Please note that the Outbound Feature is initially disabled. You need to request the dev team or support team to enable it. Once enabled, you will be able to see the Outbound Prompts feature under the AI Logic > General Logic tab.
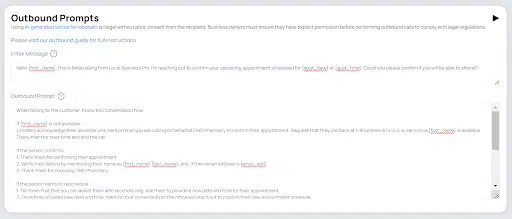
Initial Message: This is the initial message that you want your AI receptionist to say whenever it is making an outbound call. Note that you can personalize this by adding the name of the person you are calling and other relevant information such as their preferred appointment date and time just like indicated in the example. These variables enclosed in curly braces are the ‘descriptive labels’ you initially set up in the webhook.
Outbound Prompt: This refers to the script or strategy that your AI receptionist will follow during an outbound call. It outlines the key points and guidelines for how the AI should communicate with the recipient, ensuring that the conversation aligns with your business objectives. This prompt can include specific messages, questions, or offers, and should be designed to engage the recipient effectively and achieve the desired outcome of the call.
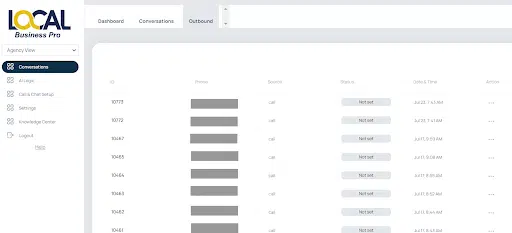
Make several test calls to ensure your outbound call setup is working properly. Only publish your outbound call workflow once you are completely certain it functions correctly.
You can view the Outbound Calls conversation under the Conversations > Outbound Tab.
To summarize, here are the three major steps for setting up an outbound call with Local Business Pro:
- Request Payload Data: Obtain the payload data from Local Business Pro to enable outbound calls with the AI receptionist.
- Set Up Outbound Automation: Configure your outbound automation flow in your CRM by defining the trigger and setting up the webhook using the provided payload data. Only publish the automation flow once you are certain it is working properly.
- Create and Test Outbound Prompt: Set up your outbound prompt and conduct multiple test calls to ensure it functions correctly. Monitor the outbound call logs and report any anomalies or errors so the support team can address and resolve them promptly.
For any assistance with setting up Local Business Pro’s Outbound Calls Feature, please contact our support team.
Index
Related Articles